Monday 19 March 2012

Mermaid

I've been thinking about trying a mermaid for a while. I had a general idea of what I wanted her to look like, but it was easier said than done.

I have been working on mixing colours and made about 6 different shades of green for the tail The body is a very pale green with pearl mixed in.. I formed the body first, and then head. The face was giving me no end of problems so I kind of left it until last - not the best idea but it was frustrating me.

The tail took me ages, I could not figure out how to get the scales to work, plus I wanted to blend all my greens so it didn't look like bricks. In the end I blended the colours together, then cut them with a scalloped blade. Laid the strips so they just over lapped and ran that through the roller. Then I re-cut the resulting clay into scalloped strips again and wrapped then around the tail. I think it probably took me about 2 hours to figure out how to get the tail to work, but know I have a process I like I can do it quickly next time.


Once the tail was wrapped I formed the fin, added the hair and then went back to the face. In the end I just used sniped off headpins for eyes. No nose (well, she is a mermaid!) and no mouth, I am going go have to work out a face I like.

In the end I am really happy with my first mermaid and am going to refine her. 


Sunday 11 March 2012

Canes

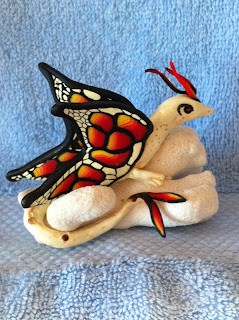
The more I look at artwork created using polymer clay, the more I come to realise that I really should start experimenting with canes. So, never one to start off with easy stuff, I downloaded a tutorial on butterfly wing canes and had at it.
I'm sure I didn't do it the 'correct' way, but as an article I just read said (and I paraphrase), 'there is no wrong way in art".
Once the cane was made (looking vaguely like the one in the tutorial...) I then had to decide what to do with it. Well, make a dragon of course,


So, here it is. The next one will be better as I'm going to thin the wings out, but I'm pretty happy with the way it turned out.


Sunday 12 February 2012

Dragons

"Why aren't you making Dragons?" David asked me. Good question.....I had dragged him too the beach weeks earlier to help me find pieces of washed up coral as I had had an idea to use them as the sun backed rocks that little dragons would lie on. Since that time the coral had been sitting outside waiting to be used.
I pulled out the copper coloured clay to use as my base and started work. 
I wan't sure if the clay would fuse to the coral during the baking process, and as it turns out it does - sometimes. However, this little dragon did not. So, I asked David to glue him on. When I got home from work that day David showed me the piece - but he had added a couple of touches of his own. He has boxes full of trees, bushes, benches, people etc that game from an architectural model that he was given. The palm tree and bush were the perfect scale for the dragon and really finished the piece. 


The second dragon was already fused to the coral as his tail was wrapped around it. I tried adding a tree to his rock, but it didn't look right, then David showed me the little people that had in his box of goodies. Perfect!


The third dragon was a challenge. I wanted to create one with mantled wings. The problem there was that the clay softens when it is baked and I ran the risk of them collapsing. I used tinfoil to hold them in place, put him in the convection oven and crossed my fingers. Luckily it all worked out quite well, good enough that I am going to make more like this.


More Horses. Sea and otherwise....

Boxes full of shiny stuff and colourful clay started arriving. - now I had to figure out what to do.As I had really enjoyed making the seahorses I decided to make some of those first.  I was happy to see that they showed an improvement in technique from my first attempts, although the heads still need work.

I  experimented with using molds to create the Flower Seahorse. The centre of the flowers are tiny Swarovski crystal rhinestones.


I made some simple canes for the first time. They worked out well and made lovely fins


This time I used molds to create the manes for the horse heads, and I think I like the look better as it is not so messy.


Then I just had to make a unicorn! 


My first clay attemps

David gave me some polymer clay for my birthday in October. From the minute I started messing around with it I was hooked!


The first thing I made was this dragon from Christi Friesens's book. It took me a couple of hours, but was so much fun I just had to keep going.

I made a couple more little dragons - then realized that as the fabric I had purchased to create little girls tutus for the Craft Fair was MIA on a boat somewhere in the Bahamas, clay ornaments would be another option.
So, I went to Christi Friesen's website and downloaded some of her lessons. One of which was a horses head. This is the first one I made. 


I have a box full of metallic threads which I though might look good in manes, so, after checking first that they would not melt in the oven I used them in the next horse.


Time to branch out to my own design ideas. Melinda suggested seahorses - I loved that idea so started working on them. This is the first one. He's a bit messy, but had a great head.


I also did a couple of birds. This was the first one.


In the end I had about a dozen pieces to take the the Craft Fair, and sold them all. A local gallery owner stopped by my table and told me that she wanted to sell my stuff, which was thrilling! Of course, that meant I just HAD to buy more clay, beads, rhinestones.......